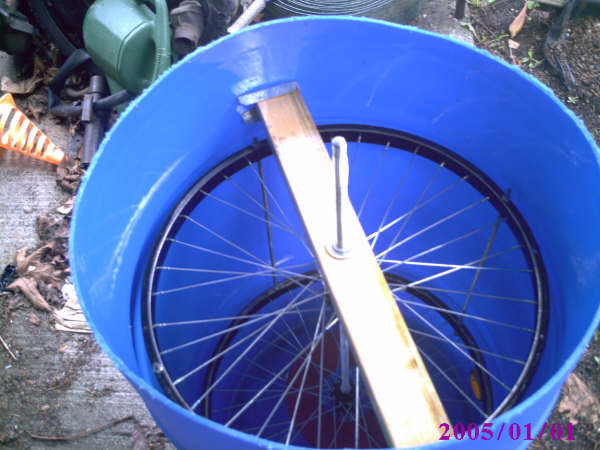
Roll Your own Extractor“What are the odds this will catch fire and explode?” asked my wife, as I pitched her my latest project. A veteran, some would say survivor of fourteen years of my schemes and contraptions, my wife saw the gleam in my eye as soon as I started describing it. I never meant to own an extractor, not when I started. I planned to stay small, have two or three hives, and harvest my honey via crush and strain. The first two years that’s exactly what I did. This year though I intended to change things up because I had a problem. The problem is honey tastes so good. My beekeeper friends assured me there’d be more if the bees didn’t have to rebuild their comb every year. More honey: What’s not to like about that? The answer is price. Extractor prices left me thinking that the bees would just have to work overtime. Then on Beesource (www.beesource.com) I found a link to a set of pictures and descriptions of a home built radial extractor. There are number of plans on the net for these including all wood ones, welded metal ones, and plywood/mesh/steel hybrids. This set of plans was unique in that it used existing items to fabricate the frame cage: bicycle wheels. You can view the original article and plans at http://www.scienceinafrica.co.za/2005/september/honeyextractor.htm. My wife had given me tacit go-ahead to purchase an extractor this year. Now that I’d seen these plans the thought stuck in my brain like a bee in my veil. I would build my own extractor. Keep my money in my pocket, keep my comb in my frames, and harvest as much honey or more. First I had to get the plan past my wife. “That was a complete and total fluke. I couldn’t make that happen again if I wanted to,” I caught a sharp look and added, “Which I don’t.” I waited for her parry, ready with my repertoire of responses. Instead she gave a sigh. I’ve heard that sigh. It’s a mixture of “here we go again” and “I wonder what color the emergency room walls are this month?” ”It means more honey, right?” she asked. Of course it did, I assured her. Anyway, we have the nicest firefighters I’ve ever met just a few blocks away. Just in case. Well SpokenThe bicycle wheel extractor begins with a bike. The frame cage is made of the bicycle rims, with the spokes serving to hold the frames in place. Which bike you want is based on your drum and your frames. Not all bike wheels are created equal, primarily because of the spoke design. For the western supers I use, I discovered that the front wheels of some sixteen inch bicycles would fit nicely, while the rear wheel and some other spoke patterns wouldn’t allow western frames (but did allow true shallow frames). The way that I discovered this involved my daughter’s bike. “You don’t need a wrench to put on streamers,” she said. Her bike wasn’t right anyway. I didn’t want to buy two bikes just to sacrifice the front wheel, so tape measure in hand I descended on yard sales and thrift shops, carrying a western frame along for a “test fit”. Oh, the looks I got as I waited for kids at a yard sale to climb off a bike and then tried to stick a frame between the spokes of each wheel. I wish I had just worn my bee suit. It’s stylish, comfortable, and it hides my face. Measuring bike rims, I made another interesting discovery: 24 inch bike tires come on nineteen inch rims. Since most drums (the other major component of the bicycle extractor) have a twenty inch diameter this meant that a nineteen inch rim would do fine. Finally I struck gold at the local thrift store and for the princely sum of $5 I left with my bike. I left with the frame still stuck through the wheel. The cashier, the people in line, the people outside, they stared. I just smiled and waved. At home the wheels came off. I had this curious urge to put the bike up on cinder blocks just to give the neighbors something else to talk about. The wheels I proceeded to strip. Have you ever removed a bicycle tire? They were designed by Satan. The tiny tool that comes with spare tubes is probably provided free of charge by bandage companies, because it’s guaranteed to generate some income for them when you split your knuckles. That’s ok though, because I had a special tool in my tool box for removing bike tires – pruning shears. I sat in my living room, spinning the empty rims, keenly aware of my wife staring at me from time to time. You’ll need to remove the bearings and prepare to expend elbow grease cleaning these rims. Remember, everything here will touch your honey. Hold it to hospital level standards of clean. Better yet , hold it to “My mother would eat off this” standards of clean. The front bearings will come out easily with the axel, leaving the rim easy to clean. If your bike has a free wheel on the rear (and most large bikes will) you will need to take a detour. The freewheel is designed to allow boys to show off by pedaling backwards without slowing down, while not holding on to the handle bars and standing up, playing a kazoo, and waving to the neighborhood girls. Girls always giggle when boys crash. Freewheels are also hard to remove, because the direction you need to rotate them to remove is the direction the ratchet lets them slip. You have two major choices: One – use an inside pipe wrench and take it out. It’s not like you will ever use this as a bike again. Two – take it to a local bike shop. They’ll use a special tool to remove it, often for free. Now your back axel can have the bearings removed and be cleaned to Mom’s standards as well. The other major component of the bicycle extractor is a barrel to put the cage in. For a barrel I chose a 55 gallon blue food grade plastic. This barrel is just over twenty one inches inside, despite a nominal diameter of twenty inches. My barrel once stored 55 gallons of Worcestershire sauce, but someone must have barbecued a whale because it was empty when I got it. For fifteen dollars I took it home. It stank horribly. If you have the chance, sniff the inside of your barrel before you buy. The voice of experience says “Choose something less smelly than steak sauce, please.” Soap and water, elbow grease, tomato juice, vinegar – none of these scratched the steak sauce. Given time in the sun it eventually dissipated…a little. Eventually I covered the drum in camcote. It was that or cut off my nose, and I wanted to save my emergency room visits for later. The mouth of the drum turned out to be seventeen inches, so I cut off three inches from the top, taking the narrow part and leaving me with a 21 inch wide blue plastic drum. My wife examined it with the same attitude one gives a dead skunk. She sniffed and gagged. “It’ll get better,” I said. It couldn’t have gotten worse. Cage MatchTo make the frame cage you begin my measuring four equal points on the outside rim of the bike. Mark these. Make sure the spokes line up. These four points are where you will use thin threaded rod to attach the wheels together. The goal of the cage is to hold the frames upright and in place, with the top bars pressing against the outside rims. The four threaded rods will add stiffness to the cage, which matters when you get sixty pounds of honey moving fast. Drill out holes in each of the rims at the four spots you marked. Go clear through the rims (both edges). Now you need threaded rod. I bought ten foot of ¼ all thread in two and ½ foot sections for $2.50 each. That’s $10 for ¼ inch threaded rod. Also bought 32 ¼ stainless nuts for 4.00 for a bag (would have been cheaper to buy them in smaller bags + the individual nuts). Your goal is to have the ears of the top bar touching the rims, everything else free to fling into the drum. For me that was 22 inches for each section of rod. I use two nuts on the top and two nuts on the bottom of each side of the rim. Measure carefully – the distance between the rims needs to be even or the cage will be unbalanced. Once the cage is assembled, it’s time to put the axel through. 4 foot of ½ threaded rod cost me $5, ten ½ stainless nuts were 2.00. Push the threaded rod down through the bike rim axel and once it’s past the first rim start screwing on two nuts. The center portion of the cage will have four – two pressing against the top of the cage, two against the bottom. On the bottom of the bottom rim you’ll have four nuts as well, two pressing against the bottom rim, and two ½ an inch from the bottom of the rod. The bottom two bolts will rest against the bottom bearing. Thread two bolts onto the top of the all thread to press against the cage from the top. Congratulations, you have assembled the cage. You’ll need loc-tite but don’t use it yet. You want to balance the cage before locking the bolts. To hold the threaded rod in the bottom of the extractor I used one of two ½ id radial bearings. I stripped the grease from the inside of the bearing. When the ball bearings clink that’s a good sign…and a bad one. No grease means it won’t make your honey greasy. Of course no grease is bad for the bearings. Honey seems to work somewhat for lubricating the bearings. To support the bearing I took a nylon cutting board (heavy plastic and ripped it on a table saw to a 5x5 square. The outside diameter of my bearing is 1 3/8, the ideal hole would have been 1/14. I had a 1 3/8th hole saw and used it. The bearing fits but would have fit better in a “too small” hole. Four holes in the corners of the block allow me to mount 5/8 stainless steel carriage bolts to the block. Put your block on the bottom of the drum, mark and drill the holes. Be careful! It needs to be centered. If you use a plastic drum the casting will show you where the midline is. Bolt it all together and now the bearing will rest nicely in the 1 3/8th hole in the center. I put the cage into the drum and gave it a spin. Ah – sweet success. Except that I had to hold the top level or the cage bumped the sides. Holding the top of the cage is a tedious and error prone process, so I decided to build a brace. 2x3 wood, cut to 22 inches exactly pushed against the sides of the barrel. My 1 3/8th holesaw provided another hole to rest the top bearing in (centered on the brace). I wanted my extractor to be able to come apart for cleaning or to swap in a tangential cage for deep frames, so I used fence brackets (2) on the outside edges. I bolted them to the drum using #8 coarse bolts, one inch long. The brackets are reversed – they both do not open the same direction. That means that to put the cage in I slip it past the brackets at an angle and socket the bottom of the rod in the bottom bearing. Then the top brace goes over the axel and rotates into the brackets. If I turn the cage the opposite direction without cotter pins in the fence post brackets it will fly out. Don’t do that. In fact, plan to use cotter pins to hold the top brace in place. If you don’t do this, plan on having the top brace work its way loose several times. Also, now is a good time to take a four by three inch sheet of flashing and cut a ¾ in ch hole in it. Center this over the top bearing and run screws through it to hold the top bearing so that it cannot fly out if your extractor wobbles.
At this point, step back and give your cage a good spin. Watch to see if it wobbles. It helps to run some water in the bottom of the drum to keep it steady. If it’s balanced at low speeds hook a drill to the center axel and slowly spin it up. At higher speeds imbalances become clearer. You will need to tweak the cage/and or brace to balance it by adjusting the bolts so that it spins level. Once they are balanced use the loc-tite to fix the bolts in place. To the Starting GatesI put a Honey Gate in the bottom of my barrel – you don’t have to. To install this I used a 2 ¼ inch hole saw and put the gate so low I had to rotate the gate instead of the locking nut to install it. The lower the better, less tilting the drum to get that last honey out. Other solutions to the honey gate problem are available – one could use a ball valve or food grade plastic spigot. One word of warning about the honey gate – never, never, never turn your back on the honey gate. That small piece of molded plastic is evil. If you have extracted 85 pounds of honey, and set a filter bucket under the gate, and opened it, do not turn away for a second. Not even if a bee stings you in the palm. Not even if you step backwards into the space heater that’s warming the room. Not even if you lunge forward into the table holding the supers, shaking your hand while rubbing your leg. Because if you do…the honey, in that moment will pile up faster than the laws of gravity should allow. You’ll lunge for the gate and wind up oney coated, bee stung, burnt, and mashed. You do not even want to know how I know this. The final step was using a coat of food grade epoxy paint – cam-cote. A single quart put three coats on the cage, brace, brackets, and bearing mounts. Then I sealed in the steak stench with cam-cote, putting two more coats on the drum. I still have half a quart. I could have gotten away without painting the drum if I had chosen a less smelly one. If you use a metal drum it might be a good idea regardless. The original plans call for a wire rim around the bottom of the cage to give the frames something to rest on. I cut a plastic lid from a five gallon bucket to create a support disk and threaded it into the cage. The bottom edge of the frames rests comfortably on the plastic disk, the top bars are held in place by centrifugal force once the extractor gets going. An ideal one would have a tiny hole so that it barely fits around the spindle, another project for the winter. Total Cost: 76 dollars (rounding up). Dadant has a cheap plastic extractor that looks like it came from a happy meal and lasts about as well for $100 + shipping. It does two frames tangential. The only real advantage is that it does deep frames. Building a tangential basket for the bicycle extractor would cost roughly $12, assuming one used the left over cam-cote and bought cull lumber. The extractor extracts nine medium, western or shallow frames at once, radial style. A drill can be hooked to the shaft to drive it. My mind is already at work concocting a belt and motor system to make it even easier, and steel legs to make a stand for it. Disadvantages: No deep frames. In days of yore bicycles had spokes that did not overlap. One of these wheels would be able to hold deep frames. Also, I didn’t build a stand. The extractor gets very heavy and someone has to lift it to drain the honey from the gate. That someone, in case you are wondering, is me. Could it be cheaper? Absolutely. I could probably have done much better on the bolts. A free bike or barrel would have helped the bottom line as well. If I hadn’t used the cam-cote or the honey gate (the original design did not) the cost would have been about $50. Still, for $76 it’s a useful piece of equipment. The proof of any piece of equipment is in the use, so I uncapped a stack of supers and loaded them one by one into the extractor. Balance is critical to this design – the extractor will wobble like a drunken hula dancer if the frames aren’t distributed right. It holds nine frames, shallow, medium and western. I hooked my drill to the shaft and slowly spun it up. My wife stood in the corner, watching as honey splattered against the drum and began to pool. The extractor acted as a squirrel cage fan, blowing the scent of warm honey through the house. My kids gathered, drawn in by the scent. After a time I stopped and flipped up the gate. Inside a pool of gold collected, pungently scented of blackberry. Take that, thrift store gawkers. Fresh blackberry honey, spun in my own basement, on my own equipment. More honey, for less money. I lifted the honey gate, teasing a spoonful of honey from the drum and brought it to my wife. She sampled it and a smile spread across her face. “It can stay,” she said. High praise indeed.
Low accuracy Cost AnalysisBike Wheels (bike optional) $5 Drum with Steak Stench $15 ¼ Inch Threaded Rod, 10 foot - $10 32 ¼ inch nuts, 4.00 for too many. ½ allthread, Four feet - $5 ½ inch nuts (ten) - $2 ½ inch ID radial bearings (2) - $5 #8 1 inch coarse bolts with nuts (4) – 1.00 Loc-tite – $3.00 Two fence brackets - $1.50 2 Inch Honey Gate - $12 Cam-cote, 1 quart - $12 Two Cotter Pins: $.50 6x8 metal flashing $.75 Total - $76, as computed on my Pentium, which insists I have 4.21 children. Building the Extractor:
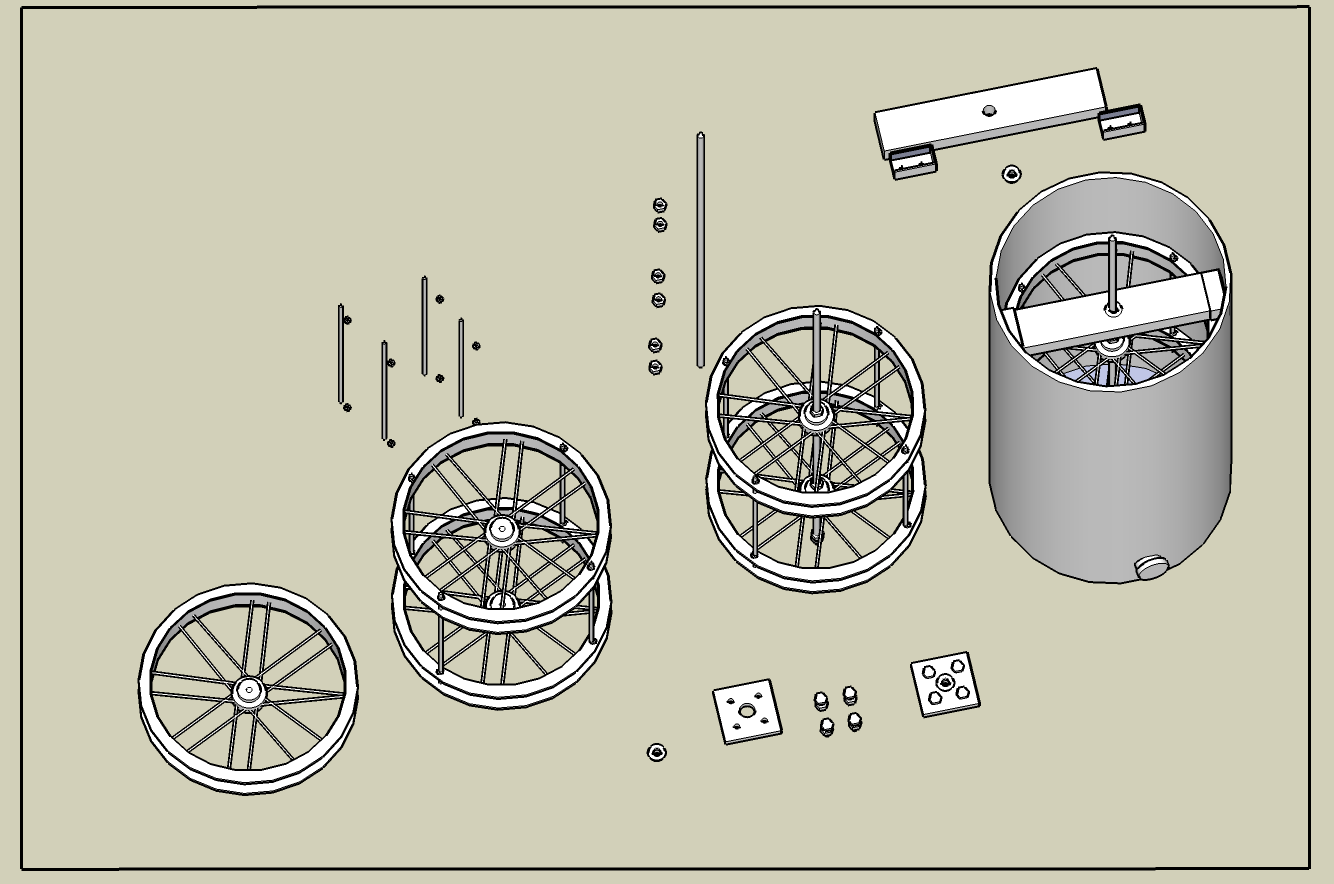
1. Acquire a barrel and a bike. The bike rims must have enough space in their spokes to allow the frames you want to extract to pass through. The barrel must be large enough to fit the rims inside, though you might need to remove the mouth to get enough room to put them in. 2. Disassemble the bike. a. Remove the tire, tube, and liner. b. Unbolt the axels, remove the bearings, and freewheel (if present on the rear wheel. c. Clean thoroughly until no traces of axel grease remain
. 3. Build the frame cage:
a. Drill four 3/8th inch holes through the outside edges of the rim at the cardinal points. Make sure that the rims line up so that when the ¼ inch rod is passed through them you can still slip a frame through the spokes into the cage. b. Cut the threaded rod into four 22 inch sections. c. Using 1/4th inch bolds, bold the 1/4th inch threaded rod through the outside holes in the rim to produce the frame cage. Use a bolt above and below each edge of the rim. d. Pass the ½ inch threaded rod through the axel hole in the wheels, turning on ½ inch stainless bolts as you go. Two bolts at the top and bottom of each rim hold it to the center shaft. Leave ten inches below the bottom wheel. Two bolts ½ inch up from the bottom of the rod form the base which fits into the bottom bearing. e. Test spin the cage to balance it. f. Use Loc-tite to fix all bolts in place. 4. Cut the plastic from the center of a five gallon bucket lid. Discard the outer ring. a. Drill a hole in the center of the plastic disk larger than the diameter of your wheel hub. b. Cut from the inside to the outside of the disk. c. Thread the disk through the spokes, around the hub of the bottom wheel of the frame cage. This disk will support the frames, preventing them from falling through. 5. Build the bottom bearing block: a. Cut a 5x5 inch square from a nylon cutting board to make the bottom bearing mount. b. Drill four ½ inch holes, one in each corner. Drill a 1 3/8th inch hole in the center for the bearing. c. Turn the barrel over and locate the exact center of the bottom. d. Center the bottom bearing mount on the barrel bottom and mark the four mounting holes e. Drill the mounting holes and mount the bottom bearing block in the barrel using ½ inch stainless bolts. 6. Drill and mount the honey gate if using one. Remember to place it as low as possible. 7. Measure and mark a position for the fence brackets on opposite sides of the barrel. 8. Drill and mount fence brackets. Face them opposite each other. 9. Build the upper support: a. Cut a 3x2 to 22 inches and mark the center. b. Drill a 1 3/8th inch hole in the center of the support block. c. Fit the upper support into the fence brackets and mark the cotter pin locations. d. Drill the cotter pin locations out. e. Place the ½ inch I.D. radial bearing in the upper support. f. Cut a strip of flashing to 2x5 inches and drill out a ¾ inch hole in the center. g. Use sheet metal screws to screw the flashing down over the bearing, holding it in the block. 10. Turn the barrel right side up and place a 1/2inch I.D. radial bearing in the bottom block. 11. Put the cage into the extractor. The bottom shaft should set into the bearing, resting on the bolts on the bottom of the shaft. If the shaft hits the bottom of the barrel your bottom bolt is too high. 12. Place the center support down over the top of the shaft and rotate into the fence brackets. 13. Set the cotter pins in the fence brackets. Give it a test spin. The cage should rotate freely on the bottom radial bearing and be held in place by the upper support. If it spins freely, doesn’t wobble and looks generally good then you are reading for the final steps: 14. Disassemble everything and wash it thoroughly again. 15. Allow the metal to completely dry and then coat with at least three coats of cam-cote food grade paint, sanding between each coat. 16. Coat the upper support in camcote as well, three coats, sanding between each. 17. Allow to dry before re-assembling. |